Cream-Filled Donuts Treat
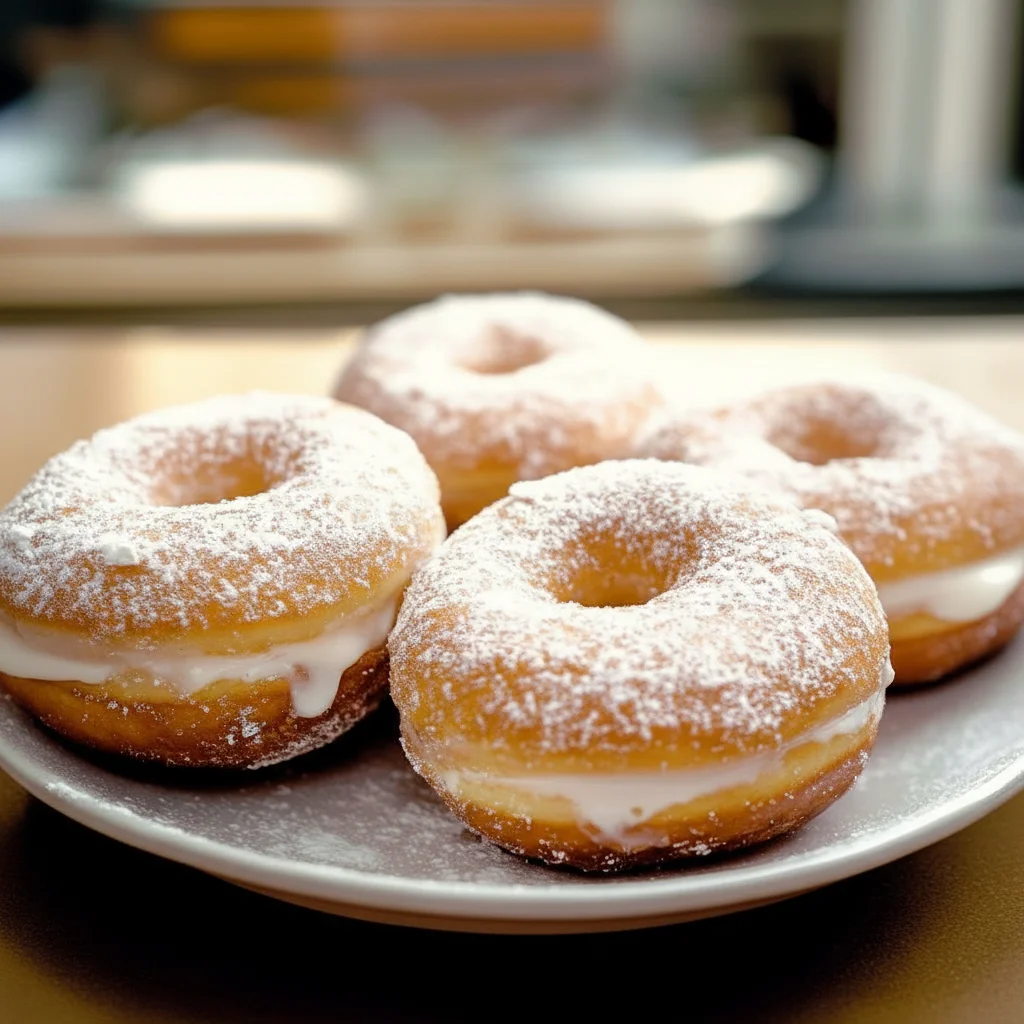
There is something truly magical about biting into a warm, pillowy donut that gives way to a burst of cool, luscious cream. It’s a moment of pure indulgence that store-bought versions rarely capture. For years, I was intimidated by the idea of making filled donuts from scratch, imagining a complicated, messy process. But once I cracked the code, I realised it’s a deeply satisfying kitchen project that yields incredible results. My kids absolutely devour these cream-filled donuts every time I make them; the silence that falls over the kitchen, broken only by happy murmurs, is my reward.
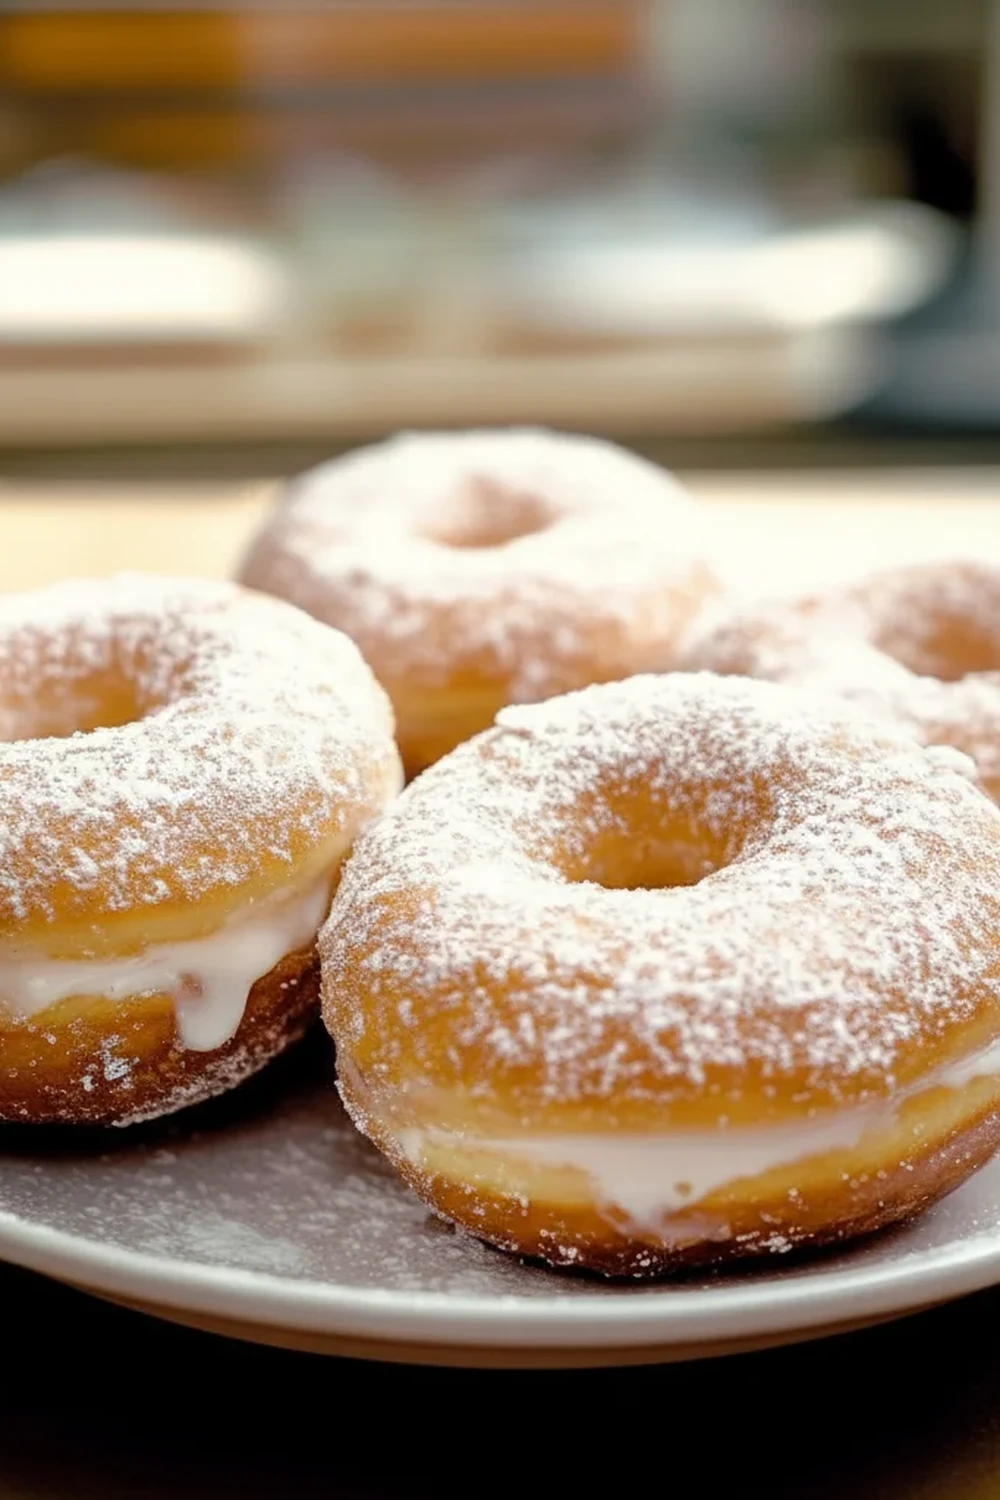
This recipe is for a classic yeasted donut, which gives you that light, airy, and slightly chewy texture that is the hallmark of a proper bakery treat. We’ll fry them until they are a beautiful golden brown, with that signature pale ring around the middle, before filling them with a rich, velvety vanilla cream. The final dusting of icing sugar is the perfect simple finish.
These cream donuts are ideal for a lazy weekend morning, a special brunch, or simply when you want to create a little bit of joy. They take a little time, mostly for the dough to prove, but every step is straightforward and the payoff is immense. This is more than just a recipe; it’s an invitation to slow down and create something wonderful with your own hands.
Recipe Overview
This recipe guides you through creating classic, soft yeast-risen donuts filled with a decadent homemade vanilla cream. The dough is enriched with butter and egg for a tender crumb, while the filling is a simple yet elegant crème pâtissière that holds its shape beautifully. I’ve found that letting the dough have its full second prove is non-negotiable for achieving that impossibly light texture.
- Prep Time: 30 minutes
- Proving Time: 2 hours
- Cook Time: 15 minutes
- Total Time: 2 hours 45 minutes
- Servings: 12 donuts
- Difficulty: Medium
Why You’ll Love These Cream-Filled Donuts
- Sublime Texture and Flavour: The contrast between the warm, soft, slightly chewy fried dough and the cool, smooth, vanilla-flecked cream filling is simply stunning. It’s a genuine bakery-quality experience.
- A Rewarding Weekend Project: While it takes a few hours, most of that is hands-off time. It’s a satisfying process that fills your home with the wonderful aroma of baking bread and sweet treats.
- Totally Customisable: The vanilla cream is a brilliant base, but you can easily adapt it. Fold in melted chocolate for a chocolate cream, or swap it out entirely for your favourite jam or even a lemon curd.
- Works Wonderfully for Gatherings: These are a showstopper for a coffee morning with friends or as a dessert for a family lunch. They always get so many compliments. For another treat that works for gatherings, you could try my Big Batch Pasta Salad.
- Family Tested and Approved: This has become a family favourite in our house. Seeing the delight on everyone’s faces makes the effort worthwhile every single time.
Ingredients You’ll Need
For the best results, use good quality ingredients, especially the flour and vanilla. I always use a strong white bread flour for this recipe as its higher protein content gives the donuts a superior structure and chew. For the vanilla, a good vanilla bean paste offers the best flavour and those beautiful black specks in the cream.
- For the Donut Dough:
- 500g strong white bread flour, plus extra for dusting
- 7g fast-action dried yeast (1 sachet)
- 60g caster sugar
- 1 tsp fine sea salt
- 250ml whole milk, lukewarm
- 2 large free-range eggs, lightly beaten
- 75g unsalted butter, softened and cubed
- About 1 litre sunflower or vegetable oil, for frying
- For the Vanilla Cream Filling:
- 300ml whole milk
- 1 tsp vanilla bean paste or 1 vanilla pod, split
- 3 large free-range egg yolks
- 70g caster sugar
- 25g cornflour
- 25g unsalted butter
- For the Topping:
- 50g icing sugar, for dusting
Kira’s Tip: Ensure your milk for the dough is just lukewarm, not hot. If it’s too hot (above 43°C), it can kill the yeast, and your donuts won’t rise. A good test is to dab a little on your wrist; it should feel comfortably warm.
How to Make Cream-Filled Donuts
We’ll start by making and proving the dough, then prepare the cream filling while the shaped donuts have their final rest. The final steps are frying, cooling, and filling. Just follow along, and you’ll have perfect cream donuts.
- Make the Dough: In the bowl of a stand mixer fitted with a dough hook, combine the flour, yeast, sugar, and salt. Give it a quick mix. In a separate jug, whisk together the lukewarm milk and beaten eggs. Pour the wet ingredients into the dry and mix on a low speed until a shaggy dough forms.
- Knead the Dough: Add the softened butter to the bowl, a few cubes at a time, mixing until each addition is incorporated. Once all the butter is in, increase the speed to medium and knead for 8-10 minutes. The dough should become smooth, elastic, and pull away from the sides of the bowl. If kneading by hand, do so on a lightly floured surface for about 15 minutes.
- First Prove: Place the dough in a lightly oiled bowl, cover with a clean tea towel or cling film, and leave to rise in a warm place for 1.5-2 hours, or until it has doubled in size. The time can vary depending on the warmth of your kitchen.
- Prepare the Cream Filling: While the dough rises, make the cream. Heat the 300ml of milk and vanilla in a saucepan until it’s just simmering. In a separate bowl, whisk the egg yolks, sugar, and cornflour together until pale and smooth. Slowly pour the hot milk over the egg mixture, whisking constantly to prevent scrambling.
- Thicken the Cream: Pour the entire mixture back into the saucepan and return to a medium-low heat. Cook, whisking continuously, for 3-5 minutes until the mixture thickens into a very thick custard. Remove from the heat, stir in the butter until melted, and pour into a clean bowl. Press cling film directly onto the surface to prevent a skin from forming and chill completely in the fridge.
- Shape and Second Prove: Once the dough has risen, tip it out onto a lightly floured surface and gently knock it back. Roll it out to about 1.5cm (just over ½ inch) thickness. Use an 8cm round cutter to stamp out about 12 donuts. Place them on a baking tray lined with lightly floured baking parchment, cover loosely, and leave to prove again for 30-45 minutes until puffy.
- Fry the Donuts: Heat the oil in a large, deep-sided saucepan or deep-fat fryer to 180°C (use a cooking thermometer for accuracy). Carefully lower 2-3 donuts into the hot oil at a time. Fry for 1-2 minutes per side, until they are a deep golden brown. I find that using a spider strainer makes lifting the donuts out of the hot oil so much safer and easier.
- Cool and Fill: Remove the cooked donuts with a slotted spoon or spider strainer and place them on a wire rack lined with kitchen paper to drain and cool. Once cool enough to handle, use a skewer or the handle of a small spoon to poke a hole in the side of each donut. Whisk the chilled cream filling until smooth, transfer it to a piping bag fitted with a plain nozzle, and pipe the cream into each donut until generously filled.
- Finish and Serve: Dust the filled donuts generously with icing sugar before serving. They are best enjoyed on the day they are made.
Tips From My Kitchen
- Temperature Control is Crucial: The oil temperature is the most important factor for success. Too low, and the donuts absorb too much oil and become greasy. Too high, and they will burn on the outside before the inside is cooked. A digital food thermometer is your best friend here. Aim for 180°C and allow the temperature to recover between batches.
- The Secret Step: I learned that cutting the baking parchment into individual squares for each donut makes transferring them to the hot oil a breeze. You can lift the paper and gently slide the donut in without deflating it with your fingers. Just remember to remove the paper from the oil immediately!
- Make-Ahead: You can prepare the vanilla cream filling a day in advance and keep it covered in the fridge. The donut dough can also be made the night before and left for its first prove in the fridge overnight. Just bring it to room temperature before shaping.
- Storage: These cream-filled donuts are definitely at their peak on the day of making. If you have any leftovers, store them in an airtight container in the fridge for up to 2 days. The dough will lose some of its softness, but they will still be lovely.
Equipment You’ll Need
- Stand mixer with dough hook (optional, but very helpful)
- Large, deep-sided saucepan or deep-fat fryer
- Digital food thermometer
- Round biscuit cutter (approx. 8cm)
- Piping bag with a plain nozzle
- Spider strainer or slotted spoon
- Mixing bowls and whisks
Common Mistakes to Avoid
- Under-proving the Dough: If you’re impatient with the proving times, your donuts will be dense and heavy rather than light and airy. A good way to check if the dough is ready after the second prove is to gently press it with a floured finger – the indent should spring back slowly. If it springs back immediately, it needs more time.
- Incorrect Oil Temperature: As mentioned in the tips, frying at the wrong temperature is the most common pitfall. Don’t guess – use a thermometer to maintain a steady 180°C for consistently perfect, golden donuts that aren’t greasy.
- Overfilling the Pan: It’s tempting to fry as many donuts as possible at once, but this will cause the oil temperature to drop dramatically. Fry in small batches of 2-3 to ensure the oil stays hot and the donuts have plenty of room to cook evenly.
What to Serve With Cream-Filled Donuts
These donuts are a magnificent treat all on their own, but a simple accompaniment can elevate the experience. For a truly classic pairing, a freshly brewed cup of coffee or a strong builder’s tea works beautifully to cut through the sweetness. If you’re serving them as a dessert, a small bowl of sharp raspberry or strawberry compote on the side provides a lovely, tangy contrast to the rich cream.
Frequently Asked Questions
Cream-Filled Donuts
Ingredients
Method
- Make the Dough: In the bowl of a stand mixer fitted with a dough hook, combine the flour, yeast, sugar, and salt. Give it a quick mix. In a separate jug, whisk together the lukewarm milk and beaten eggs. Pour the wet ingredients into the dry and mix on a low speed until a shaggy dough forms.
- Knead the Dough: Add the softened butter to the bowl, a few cubes at a time, mixing until each addition is incorporated. Once all the butter is in, increase the speed to medium and knead for 8-10 minutes. The dough should become smooth, elastic, and pull away from the sides of the bowl. If kneading by hand, do so on a lightly floured surface for about 15 minutes.
- First Prove: Place the dough in a lightly oiled bowl, cover with a clean tea towel or cling film, and leave to rise in a warm place for 1.5-2 hours, or until it has doubled in size. The time can vary depending on the warmth of your kitchen.
- Prepare the Cream Filling: While the dough rises, make the cream. Heat the 300ml of milk and vanilla in a saucepan until it's just simmering. In a separate bowl, whisk the egg yolks, sugar, and cornflour together until pale and smooth. Slowly pour the hot milk over the egg mixture, whisking constantly to prevent scrambling.
- Thicken the Cream: Pour the entire mixture back into the saucepan and return to a medium-low heat. Cook, whisking continuously, for 3-5 minutes until the mixture thickens into a very thick custard. Remove from the heat, stir in the butter until melted, and pour into a clean bowl. Press cling film directly onto the surface to prevent a skin from forming and chill completely in the fridge.
- Shape and Second Prove: Once the dough has risen, tip it out onto a lightly floured surface and gently knock it back. Roll it out to about 1.5cm (just over ½ inch) thickness. Use an 8cm round cutter to stamp out about 12 donuts. Place them on a baking tray lined with lightly floured baking parchment, cover loosely, and leave to prove again for 30-45 minutes until puffy.
- Fry the Donuts: Heat the oil in a large, deep-sided saucepan or deep-fat fryer to 180°C (use a cooking thermometer for accuracy). Carefully lower 2-3 donuts into the hot oil at a time. Fry for 1-2 minutes per side, until they are a deep golden brown. I find that using a spider strainer makes lifting the donuts out of the hot oil so much safer and easier.
- Cool and Fill: Remove the cooked donuts with a slotted spoon or spider strainer and place them on a wire rack lined with kitchen paper to drain and cool. Once cool enough to handle, use a skewer or the handle of a small spoon to poke a hole in the side of each donut. Whisk the chilled cream filling until smooth, transfer it to a piping bag fitted with a plain nozzle, and pipe the cream into each donut until generously filled.
- Finish and Serve: Dust the filled donuts generously with icing sugar before serving. They are best enjoyed on the day they are made.
Notes
I really hope you give these homemade cream-filled donuts a try. They are such a rewarding bake and a truly special treat to share. If you’re looking for another indulgent recipe, my Steak Bites With Garlic Butter are always a huge hit for a savoury meal. Let me know how you get on with the donuts in the comments below – I’d love to hear about it! Happy baking, Kira.