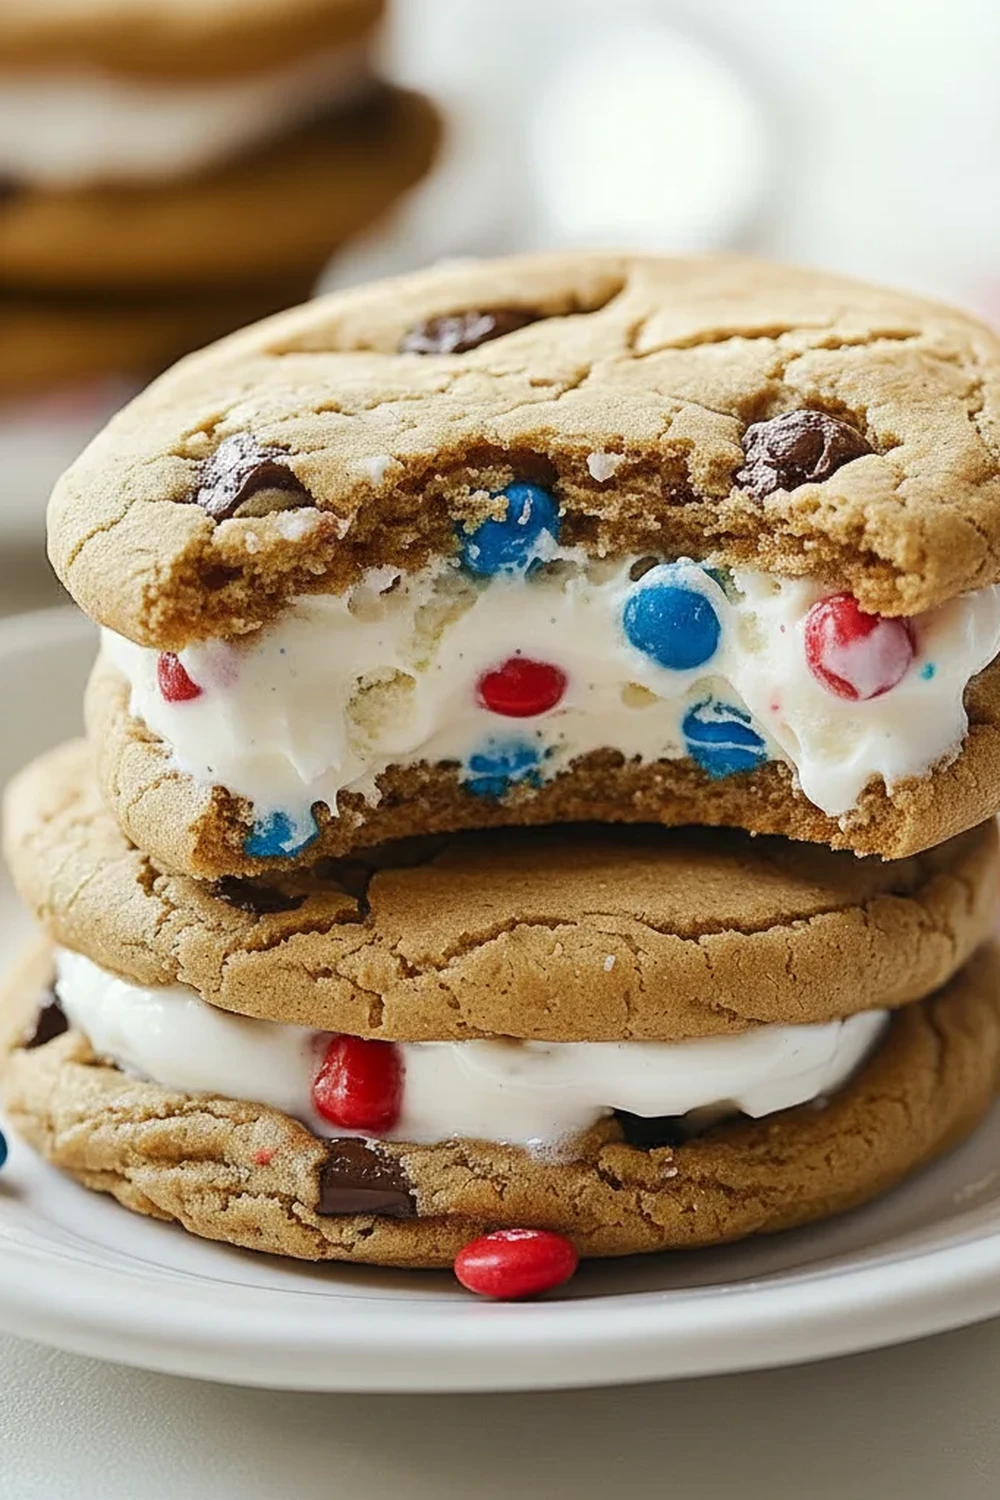
Ice Cream Sandwiches Recipe
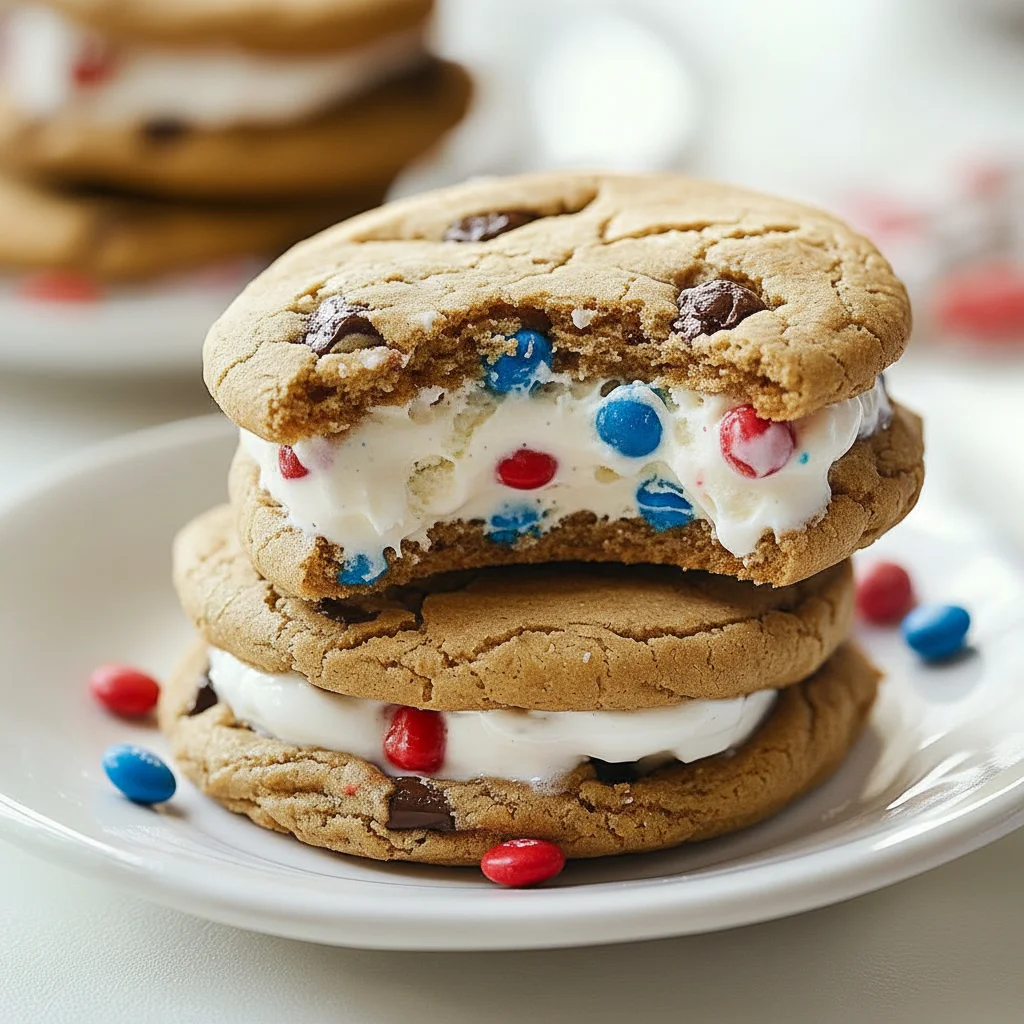
There’s something wonderfully nostalgic about the combination of soft cookies and cold, creamy ice cream. It takes me straight back to childhood summers, a simple treat that felt like the height of luxury. This homemade Ice Cream Sandwiches Recipe elevates that memory into something truly special. We’re not just slapping ice cream between any old biscuits here; we’re crafting the perfect chewy, chocolate-laden cookies that are specifically designed to be frozen. They stay soft, they don’t crumble, and they provide the perfect bite against the smooth ice cream centre.
What I adore about this dessert recipe is the sheer joy it brings. I stumbled upon this combination by accident, trying to find a cookie that wouldn’t turn into a solid rock in the freezer, and it’s been a hit ever since. The cookies themselves are rich with the caramel notes of brown sugar and vanilla, and they’re packed with just the right amount of dark chocolate chips to cut through the sweetness. This is the kind of treat that works beautifully for a sunny garden party, a family barbecue, or simply as a fantastic project to make with the kids on a weekend. Unlike other desserts that can feel a bit formal, an ice cream sandwich is pure, unadulterated fun.
If you’re looking for a dessert that always gets compliments, this is it. It’s more than just a recipe; it’s an experience. From the smell of the cookies baking to the final, satisfying bite of your own handmade cookie sandwich, it’s a delightful process. It also makes for a brilliant alternative to a birthday cake, especially for summer birthdays. Imagine bringing out a platter of these instead of your usual sponge – they disappear in minutes! And if you’re looking for other fun, sweet treats, my Cream Filled Donuts Treat is another one my family adores.
Recipe Overview
This Ice Cream Sandwiches Recipe is all about texture and temperature contrast. You get a soft, chewy chocolate chip cookie that doesn’t go hard in the freezer, sandwiching a thick layer of classic vanilla ice cream. The key is slightly underbaking the cookies and using a good amount of brown sugar, which keeps them pliable. I’ve tested this with many cookie recipes, and this specific formula yields the perfect texture every single time, even after a week in the freezer.
- Prep Time: 25 minutes (plus 1 hour chilling time)
- Cook Time: 12-14 minutes
- Total Time: Approximately 1 hour 40 minutes (plus freezing time)
- Servings: 12 sandwiches
- Difficulty: Medium
Why You’ll Love This Ice Cream Sandwiches Recipe
- Genuine Flavour: The cookies aren’t just a vehicle for the ice cream. They’re deeply flavourful, with a rich, buttery base, hints of caramel from the soft brown sugar, and pockets of intensely dark chocolate that provide a lovely contrast to the sweet, creamy vanilla filling.
- Active Time is Minimal: The hands-on prep and baking time comes together in about 40 minutes. The rest of the time is just for chilling and freezing, which is essential for the best results but requires no effort from you!
- Flexible Recipe: This is a brilliant base for your own creations. You can swap the vanilla ice cream for strawberry, mint choc chip, or even coffee. The chocolate chips can be replaced with M&Ms, chopped nuts, or even toffee pieces.
- Great for Summer Gatherings: This dessert recipe works beautifully for a relaxed weekend barbecue. It’s a fantastic follow-up to a savoury main like Crispy Fried Fish Recipe Dinner, creating a complete and satisfying summer meal.
- Family Tested: My kids absolutely devour this every time I make it. They especially love the final step of rolling the assembled sandwiches in colourful sprinkles—it makes them feel like proper little chefs.
Ingredients You’ll Need
For the best results, use good quality ingredients. Real butter makes a world of difference to the flavour and texture of the cookies, and a high-quality ice cream with a good vanilla flavour will really shine. I often use Green & Black’s organic dark chocolate chips as they have a wonderful intensity.
- For the Chewy Cookies:
- 250g plain flour
- 1 teaspoon bicarbonate of soda
- ½ teaspoon fine sea salt
- 170g unsalted butter, softened to room temperature
- 150g light brown soft sugar
- 100g caster sugar
- 1 large free-range egg
- 2 teaspoons vanilla extract
- 200g dark chocolate chips (or a chopped dark chocolate bar)
- For the Filling & Assembly:
- 1 large tub (approx. 900ml) good quality vanilla ice cream
- 50g rainbow sprinkles, chopped nuts, or mini chocolate chips for decorating (optional)
My Tip: Take the butter and egg out of the fridge a good hour before you start. Having them at room temperature is crucial for getting that light, creamed texture which forms the base of a perfect cookie.
How to Make Ice Cream Sandwiches
The process is straightforward, but the key to success is patience. Don’t be tempted to skip the chilling and freezing steps—they are what makes this recipe work so well and prevents a sticky, melty mess.
- Combine Dry Ingredients: In a medium bowl, whisk together the plain flour, bicarbonate of soda, and salt. This ensures the raising agent is evenly distributed. Set aside for later.
- Cream Butter and Sugars: In a large bowl, using an electric hand mixer or a stand mixer with the paddle attachment, beat the softened unsalted butter with the light brown sugar and caster sugar on medium speed for about 3-4 minutes. You’re looking for a mixture that’s light, pale, and fluffy.
- Add Wet Ingredients: Add the large egg and vanilla extract to the butter mixture and beat again until everything is well combined. Scrape down the sides of the bowl to ensure it’s all incorporated.
- Form the Dough: Tip the dry flour mixture into the wet ingredients. Mix on a low speed until just combined – be careful not to overmix. A few streaks of flour are fine. Gently fold in the dark chocolate chips with a spatula.
- Chill the Dough: This is the most important step for chewy cookies that don’t spread too much. Cover the bowl with cling film and place it in the refrigerator for at least 1 hour (or up to 3 days). Chilling solidifies the fat, which controls spread and deepens the flavour. You can learn more about the science behind this on food science sites like Serious Eats.
- Bake the Cookies: Preheat your oven to 180°C (160°C fan). Line two large baking trays with baking parchment. Scoop out portions of dough (about 2 tablespoons each) and roll them into balls. Place them on the baking trays, leaving plenty of space between them as they will spread. You should get about 24 cookies.
- Bake and Cool: Bake for 12-14 minutes, until the edges are golden brown but the centres still look slightly soft. What works best for me is rotating the trays halfway through for an even bake. Let them cool on the baking trays for 5 minutes before transferring them to a wire rack to cool completely. They must be 100% cold before assembling.
- Assemble the Sandwiches: While the cookies cool, let the tub of ice cream sit at room temperature for 10-15 minutes to soften slightly. Match the cookies into 12 pairs of similar size. Turn one cookie of each pair upside down. Place a generous scoop of ice cream on it and gently press the second cookie on top.
- Decorate and Freeze: If you’re using decorations, pour your sprinkles or chopped nuts onto a plate. Gently roll the exposed ice cream edges of each sandwich in the sprinkles until coated.
- Final Freeze: Wrap each ice cream sandwich individually and tightly in cling film or baking parchment. Place them on a flat tray in the freezer and freeze for at least 4 hours, or until completely firm.
Tips From My Kitchen
- Temperature Control: I cannot stress this enough: your cookies must be absolutely, completely cool before you add the ice cream. Even a hint of warmth will cause the ice cream to melt instantly, creating a soupy mess and icy crystals when it refreezes.
- The Secret Step: I learned that for perfectly neat, round ice cream sandwiches, you can use the “slab method.” Line a 20x30cm baking tin with parchment, spread the softened ice cream into an even layer, and freeze until solid. Then, use a cookie cutter the same size as your cookies to cut out perfect discs of ice cream. It’s an extra step, but the results look so professional!
- Make-Ahead: This recipe is ideal for planning ahead. The cookie dough can be made and kept in the fridge for up to 3 days. You can also bake the cookies a day in advance and store them in an airtight container. The fully assembled sandwiches keep brilliantly in the freezer.
- Storage: Properly wrapped individual sandwiches will last in the freezer for up to 2 weeks. After that, they are still safe to eat, but you might notice some ice crystals forming, which can affect the texture of the cookies slightly.
Delicious Variations to Try
Once you’ve mastered the basic technique, this ice cream sandwich recipe becomes a fantastic canvas for experimentation. Here are a few ideas to get you started:
- The Double Chocolate: For true chocolate lovers, use a double chocolate cookie recipe (by substituting 50g of the flour with cocoa powder) and pair it with a rich, dark chocolate ice cream.
- Vegan-Friendly Version: This recipe adapts very well. Use a good-quality vegan block butter substitute, a flax egg (1 tbsp ground flaxseed mixed with 3 tbsp water), and your favourite dairy-free ice cream. Most dark chocolate is naturally vegan, but do check the packaging.
- Nutty & Salty: Swap half the chocolate chips for chopped, toasted pecans or walnuts. Use a salted caramel ice cream for a sublime sweet and salty combination that always gets rave reviews.
What to Serve With Ice Cream Sandwiches
Honestly, these are a complete dessert experience all on their own! However, if you want to make them part of a larger dessert spread for a party, here are a few ideas:
- Warm Chocolate Sauce: A little jug of warm, homemade chocolate or caramel sauce on the side for drizzling is pure indulgence.
- Coffee Pairing: A freshly brewed espresso or a strong black Americano is the perfect adult accompaniment, its bitterness balancing the sweetness of the dessert wonderfully. For a family get-together, nothing beats a cold glass of milk. If you’re planning a full barbecue, why not serve these after the main event, which could include a Big Batch Pasta Salad for Crowds.
– Fresh Berries: A simple bowl of fresh raspberries or sliced strawberries provides a sharp, fresh contrast that cuts through the richness of the cookie sandwich.
Frequently Asked Questions
Ice Cream Sandwiches Recipe
Ingredients
Method
- Combine Dry Ingredients: In a medium bowl, whisk together the plain flour, bicarbonate of soda, and salt. This ensures the raising agent is evenly distributed. Set aside for later.
- Cream Butter and Sugars: In a large bowl, using an electric hand mixer or a stand mixer with the paddle attachment, beat the softened unsalted butter with the light brown sugar and caster sugar on medium speed for about 3-4 minutes. You're looking for a mixture that's light, pale, and fluffy.
- Add Wet Ingredients: Add the large egg and vanilla extract to the butter mixture and beat again until everything is well combined. Scrape down the sides of the bowl to ensure it's all incorporated.
- Form the Dough: Tip the dry flour mixture into the wet ingredients. Mix on a low speed until just combined – be careful not to overmix. A few streaks of flour are fine. Gently fold in the dark chocolate chips with a spatula.
- Chill the Dough: This is the most important step for chewy cookies that don't spread too much. Cover the bowl with cling film and place it in the refrigerator for at least 1 hour (or up to 3 days). Chilling solidifies the fat, which controls spread and deepens the flavour. You can learn more about the science behind this on food science sites like Serious Eats.
- Bake the Cookies: Preheat your oven to 180°C (160°C fan). Line two large baking trays with baking parchment. Scoop out portions of dough (about 2 tablespoons each) and roll them into balls. Place them on the baking trays, leaving plenty of space between them as they will spread. You should get about 24 cookies.
- Bake and Cool: Bake for 12-14 minutes, until the edges are golden brown but the centres still look slightly soft. What works best for me is rotating the trays halfway through for an even bake. Let them cool on the baking trays for 5 minutes before transferring them to a wire rack to cool completely. They must be 100% cold before assembling.
- Assemble the Sandwiches: While the cookies cool, let the tub of ice cream sit at room temperature for 10-15 minutes to soften slightly. Match the cookies into 12 pairs of similar size. Turn one cookie of each pair upside down. Place a generous scoop of ice cream on it and gently press the second cookie on top.
- Decorate and Freeze: If you're using decorations, pour your sprinkles or chopped nuts onto a plate. Gently roll the exposed ice cream edges of each sandwich in the sprinkles until coated.
- Final Freeze: Wrap each ice cream sandwich individually and tightly in cling film or baking parchment. Place them on a flat tray in the freezer and freeze for at least 4 hours, or until completely firm.
Notes
I really hope you give this Ice Cream Sandwiches Recipe a go. It’s a truly joyful bake that brings smiles to everyone’s faces. There’s nothing quite like biting into a homemade version—it’s a world away from anything you can buy in a shop. If you try it, please let me know how you get on in the comments below. I love hearing about your kitchen creations!
Happy baking,
Kira