Cozy Weekend Project: Copycat Cheesecake Factory Macaroni and Cheese Balls
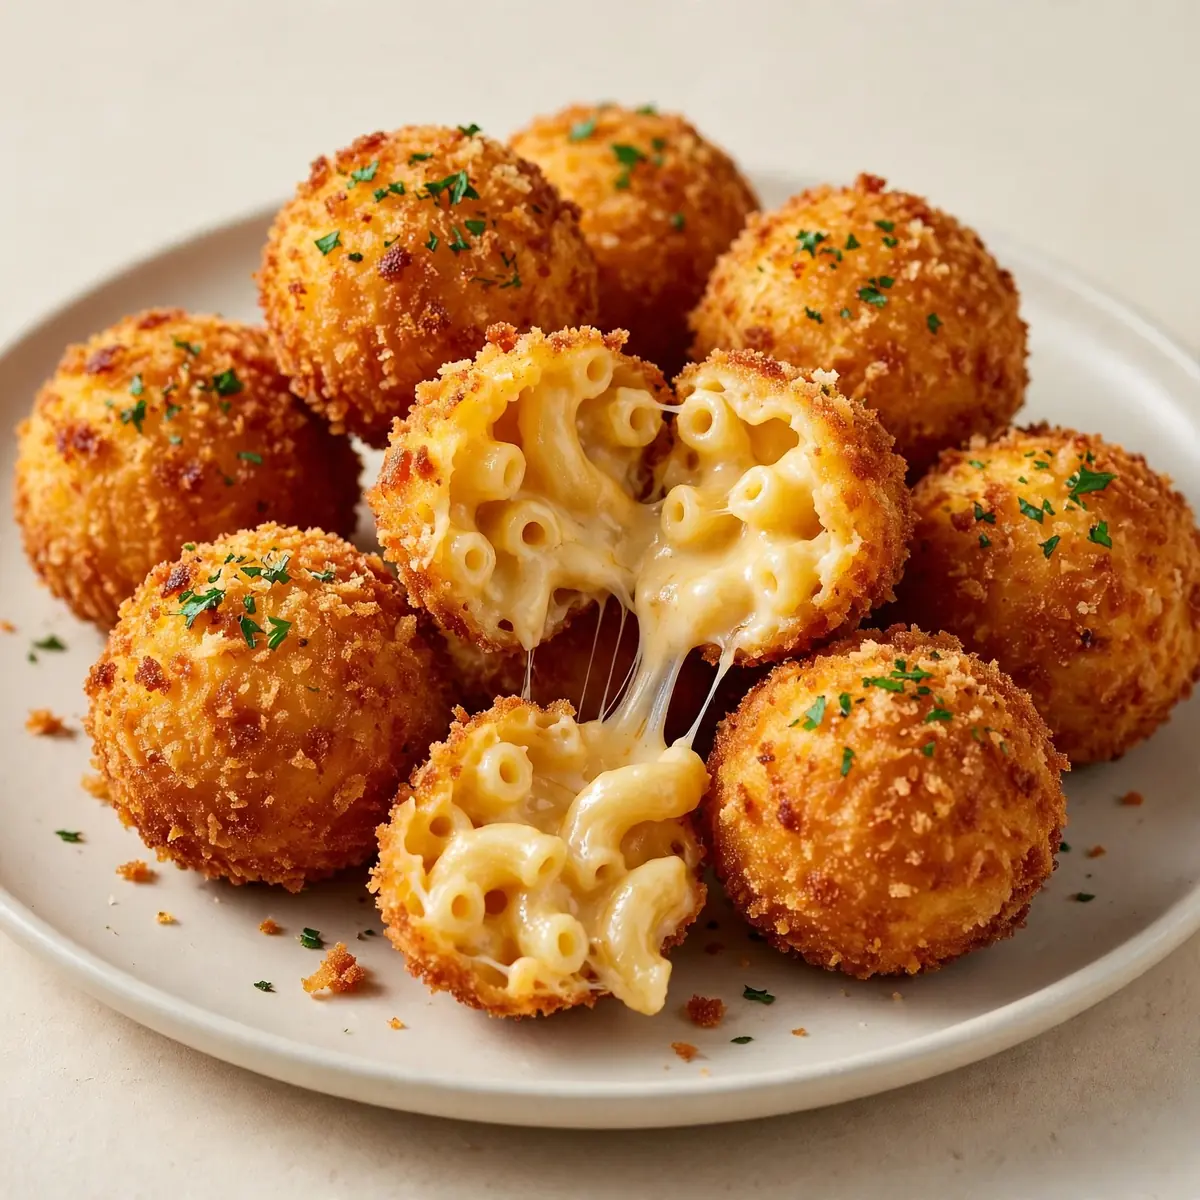
There are weekends for dashing about, and then there are weekends for standing at the stove, letting the scent of melted cheese fill every corner of the kitchen. This Copycat Cheesecake Factory Macaroni and Cheese Balls recipe is my favourite excuse to do exactly that—to slow down, get my hands a little messy, and create something that feels like a proper reward after a long week.
Recipe Overview
- Prep Time: 45 minutes
- Cook Time: 30 minutes
- Chill Time: 2 hours
- Total Time: 3 hours 15 minutes
- Servings: Makes approximately 24 balls
- Difficulty: Medium
Why You’ll Love This Copycat Cheesecake Factory Macaroni and Cheese Balls
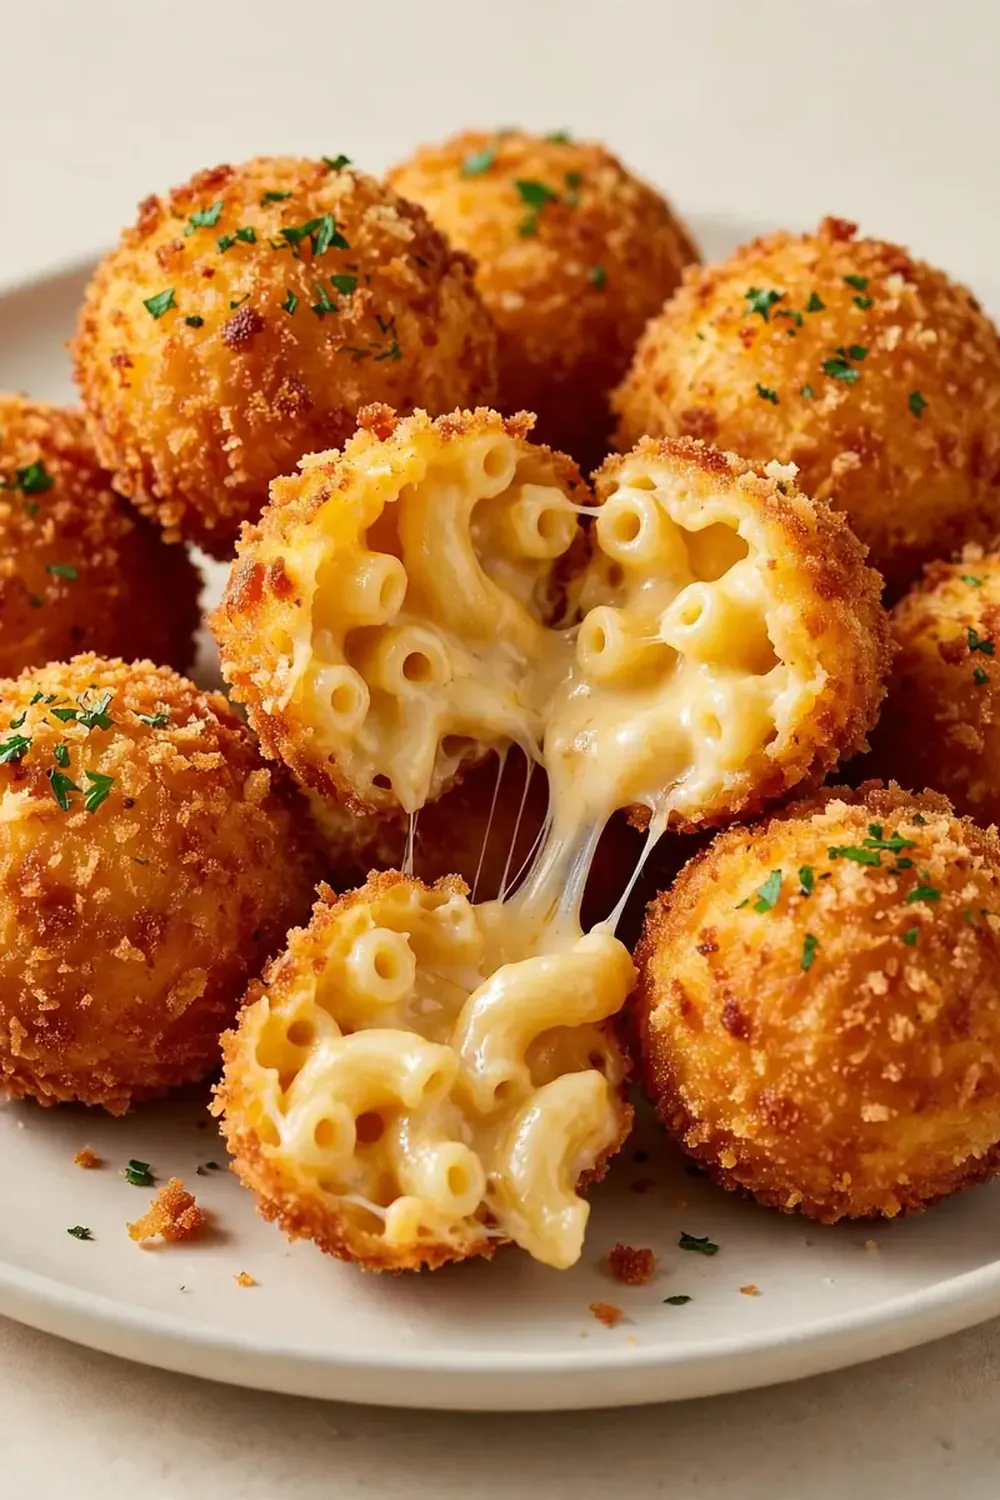
- The texture is pure magic: You get that impossibly crisp, golden shell giving way to a soft, creamy, cheesy interior that stretches as you pull the ball apart.
- It’s a proper weekend project: This isn’t a 20-minute dinner; it’s an afternoon of cooking that fills the house with the kind of aromas that make everyone wander into the kitchen asking, “What’s for tea?”
- Make-ahead friendly: You can prepare the macaroni and cheese balls the day before, keep them in the fridge, and fry them just before serving—perfect for when friends pop round.
- Customisable to your cheese stash: Whatever good melting cheeses you have in the fridge—cheddar, gruyère, mozzarella—this recipe welcomes them all.
- My husband, who’s usually picky, asked for seconds! He’s not one for deep-fried things, but the creamy interior won him over completely.
Ingredients You’ll Need
- 300g elbow macaroni
- 60g unsalted butter
- 60g plain flour
- 600ml whole milk, warmed
- 1 teaspoon mustard powder
- ½ teaspoon smoked paprika
- ¼ teaspoon freshly grated nutmeg
- 200g mature cheddar, grated
- 150g mozzarella, grated
- 100g parmesan, finely grated
- Salt and white pepper to taste
- 100g plain flour (for coating)
- 3 large eggs, beaten (for coating)
- 200g panko breadcrumbs (for coating)
- Vegetable oil, for deep-frying
Tip: Grate your own cheese from a block rather than using pre-grated bags. The pre-grated stuff contains anti-caking agents that stop it from melting into that gloriously smooth sauce we’re after.
How to Make Copycat Cheesecake Factory Macaroni and Cheese Balls
- Cook the macaroni: Bring a large pot of salted water to a rolling boil. Add the macaroni and cook until just al dente—about 1 minute less than the packet suggests. You want the pasta to still have a slight bite because it will continue cooking later. Drain well and set aside. The steam rising from the colander should smell of wheat and salt.
- Make the cheese sauce (the soul of this recipe): Melt the butter in a large, heavy-bottomed saucepan over medium heat. Once it foams and you smell that nutty aroma, add the flour. Whisk continuously for 2 minutes until the mixture turns a pale golden colour and smells biscuity. Slowly pour in the warmed milk, whisking constantly to prevent lumps. The sauce will thicken noticeably after about 4 minutes—you’ll feel the whisk meeting resistance, and the sauce will coat the back of a spoon. Remove from the heat.
- Add the cheeses and seasoning: Stir in the mustard powder, smoked paprika, and nutmeg. Add the grated cheddar, mozzarella, and parmesan in handfuls, stirring until each addition is fully melted and glossy. The sauce should be thick, smooth, and pale golden with flecks of paprika. Taste and season with salt and white pepper. Fold the cooked macaroni into the sauce until every piece is coated.
- Chill the mixture: Spread the macaroni and cheese into a lined baking tray, pressing it into an even layer about 2cm thick. Cover with cling film directly on the surface to prevent a skin forming. Refrigerate for at least 2 hours, or until the mixture is completely firm and cold to the touch. This step is essential—warm mixture won’t hold its shape when you try to roll it.
- Shape the balls: Using slightly wet hands, scoop out portions of the chilled mixture and roll into balls roughly the size of a golf ball. Place them on a tray lined with baking paper. You should get around 24 balls. The mixture will feel firm but pliable, and your fingers will leave slight impressions that you can smooth over.
- Set up the coating station: Prepare three shallow bowls: one with the plain flour, one with the beaten eggs, and one with the panko breadcrumbs. Working one ball at a time, roll in the flour (shake off excess), dip in the egg (let excess drip off), then coat thoroughly in the panko, pressing gently to adhere. The breadcrumbs should form an even, sandy layer. Place coated balls back on the tray.
- Chill again (don’t skip this): Refrigerate the coated balls for 30 minutes. This helps the coating set and prevents it from falling off during frying. When you touch them, the breadcrumb layer should feel dry and firmly attached.
- Fry to golden perfection: Heat 5cm of vegetable oil in a deep pan to 175°C. Use a kitchen thermometer—the oil is ready when a breadcrumb dropped in sizzles immediately and floats to the surface. Fry the balls in batches of 5-6, being careful not to crowd the pan. They need space to bubble and turn. Fry for 2-3 minutes, turning occasionally, until deep golden brown. The sound should be a steady, gentle sizzle—if it’s spitting violently, the oil is too hot. Transfer to a wire rack set over a baking tray (not paper towels, which make them soggy). The crust should feel shatteringly crisp and sound crunchy when you tap it.
- Serve immediately: These macaroni and cheese balls are at their absolute best within 5 minutes of leaving the oil. The contrast between the hot, crispy shell and the molten, creamy centre is the whole point. Serve with a simple dipping sauce if you like, though honestly, they’re magnificent on their own.
Tips From My Kitchen
- Chill thoroughly between stages: The mixture needs to be properly cold before you shape it, and the coated balls need a rest before frying. This isn’t negotiable—the first time I made these, I rushed the chilling step, and my balls turned into flat, cheesy discs in the hot oil. The cold temperature keeps the cheese sauce from oozing out before the coating sets.
- Use panko breadcrumbs, not standard ones: Panko has a larger, flakier texture that creates a much lighter, crunchier crust. Regular breadcrumbs will give you a dense, heavy coating that doesn’t sing when you bite into it. I’ve tested both, and panko wins every time.
- Don’t overcook the pasta initially: Al dente is crucial here. The macaroni will absorb more moisture from the cheese sauce as it chills, and if you start with fully soft pasta, the balls will be mushy inside rather than having that lovely, distinct pasta texture against the creamy sauce.
- Keep the oil temperature steady: That 175°C mark is your sweet spot. Too low, and the balls absorb oil and become greasy. Too high, and the coating burns before the centre is hot. Use a thermometer—I know it feels like extra fuss, but it’s the difference between restaurant-quality and disappointing.
- Work in small batches: Frying too many at once drops the oil temperature dramatically. You’ll end up with pale, oily balls that lack crunch. Five to six per batch means each one gets proper heat exposure and emerges that perfect shade of golden brown.
- Double-coat for extra crunch: If you want an even thicker, crunchier shell, dip the coated balls back into the egg and breadcrumbs a second time before the final chill. This is how the restaurant version gets that substantial, satisfying crust.
Equipment You’ll Need
- Large pot for pasta
- Heavy-bottomed saucepan for the cheese sauce
- Whisk
- Baking tray
- Parchment paper
- Three shallow bowls for coating
- Deep pan or heavy pot for frying
- Kitchen thermometer
- Wire cooling rack
- Slotted spoon or spider strainer
Common Mistakes to Avoid
- Overcrowding the pan: When you drop too many balls into the oil at once, the temperature plummets. The coating absorbs oil instead of crisping up, leaving you with heavy, greasy balls. Fry in small batches and let the oil come back up to temperature between batches. Your patience will be rewarded with that light, shattering crust.
- Wrong temperature: Frying at 175°C is the sweet spot. If you don’t have a thermometer, test the oil by dropping a single breadcrumb in—it should sizzle immediately and rise to the surface, but not brown instantly. If it burns in seconds, the oil is too hot. If it just sits at the bottom, it’s too cold.
- Skipping the rest time: That final 30-minute chill after coating isn’t optional. It allows the flour layer to hydrate and adhere to the egg, which then sticks properly to the breadcrumbs. Without this rest, the coating will slide off in the hot oil, exposing the delicate macaroni and cheese filling to the oil. You’ll end up with a mess, not a neat little ball.
What to Serve With Copycat Cheesecake Factory Macaroni and Cheese Balls
- A simple tomato dipping sauce or warm marinara
- A crisp green salad with a sharp vinaigrette to cut through the richness
- Roasted cherry tomatoes with garlic and thyme
- Grilled chicken thighs or a simple steak for a more substantial meal
- A bowl of Homestyle Chicken Noodle Soup on the side for the ultimate cosy weekend spread
Still hungry for ideas? You might also love Chick Fil A Mac And Cheese Recipe A Perfect Copycat, Cheesecake Factory Chicken Madeira Copycat from our sister kitchens.
Frequently Asked Questions
Copycat Cheesecake Factory Macaroni and Cheese Balls
Ingredients
Method
- Cook the macaroni: Bring a large pot of salted water to a rolling boil. Add the macaroni and cook until just al dente—about 1 minute less than the packet suggests. You want the pasta to still have a slight bite because it will continue cooking later. Drain well and set aside. The steam rising from the colander should smell of wheat and salt.
- Make the cheese sauce (the soul of this recipe): Melt the butter in a large, heavy-bottomed saucepan over medium heat. Once it foams and you smell that nutty aroma, add the flour. Whisk continuously for 2 minutes until the mixture turns a pale golden colour and smells biscuity. Slowly pour in the warmed milk, whisking constantly to prevent lumps. The sauce will thicken noticeably after about 4 minutes—you'll feel the whisk meeting resistance, and the sauce will coat the back of a spoon. Remove from the heat.
- Add the cheeses and seasoning: Stir in the mustard powder, smoked paprika, and nutmeg. Add the grated cheddar, mozzarella, and parmesan in handfuls, stirring until each addition is fully melted and glossy. The sauce should be thick, smooth, and pale golden with flecks of paprika. Taste and season with salt and white pepper. Fold the cooked macaroni into the sauce until every piece is coated.
- Chill the mixture: Spread the macaroni and cheese into a lined baking tray, pressing it into an even layer about 2cm thick. Cover with cling film directly on the surface to prevent a skin forming. Refrigerate for at least 2 hours, or until the mixture is completely firm and cold to the touch. This step is essential—warm mixture won't hold its shape when you try to roll it.
- Shape the balls: Using slightly wet hands, scoop out portions of the chilled mixture and roll into balls roughly the size of a golf ball. Place them on a tray lined with baking paper. You should get around 24 balls. The mixture will feel firm but pliable, and your fingers will leave slight impressions that you can smooth over.
- Set up the coating station: Prepare three shallow bowls: one with the plain flour, one with the beaten eggs, and one with the panko breadcrumbs. Working one ball at a time, roll in the flour (shake off excess), dip in the egg (let excess drip off), then coat thoroughly in the panko, pressing gently to adhere. The breadcrumbs should form an even, sandy layer. Place coated balls back on the tray.
- Chill again (don't skip this): Refrigerate the coated balls for 30 minutes. This helps the coating set and prevents it from falling off during frying. When you touch them, the breadcrumb layer should feel dry and firmly attached.
- Fry to golden perfection: Heat 5cm of vegetable oil in a deep pan to 175°C. Use a kitchen thermometer—the oil is ready when a breadcrumb dropped in sizzles immediately and floats to the surface. Fry the balls in batches of 5-6, being careful not to crowd the pan. They need space to bubble and turn. Fry for 2-3 minutes, turning occasionally, until deep golden brown. The sound should be a steady, gentle sizzle—if it's spitting violently, the oil is too hot. Transfer to a wire rack set over a baking tray (not paper towels, which make them soggy). The crust should feel shatteringly crisp and sound crunchy when you tap it.
- Serve immediately: These macaroni and cheese balls are at their absolute best within 5 minutes of leaving the oil. The contrast between the hot, crispy shell and the molten, creamy centre is the whole point. Serve with a simple dipping sauce if you like, though honestly, they're magnificent on their own.
Notes
There’s something deeply satisfying about pulling a tray of these golden macaroni and cheese balls out of the oil, the kitchen warm and fragrant, the first batch disappearing almost as soon as they’re cool enough to handle. This is my go-to recipe when I need something quick but impressive—well, the frying part is quick; the waiting is the hard bit. If you give these a try, I’d love to hear how they turned out in the comments below. Did you stick with the classic cheddar and mozzarella, or did you raid your cheese drawer for something different? And if you’re looking for another comforting dish to round out your weekend cooking, this Creamy Chicken Soup Recipe Bowl makes a lovely starter before the main event.