Classic Onion Rings
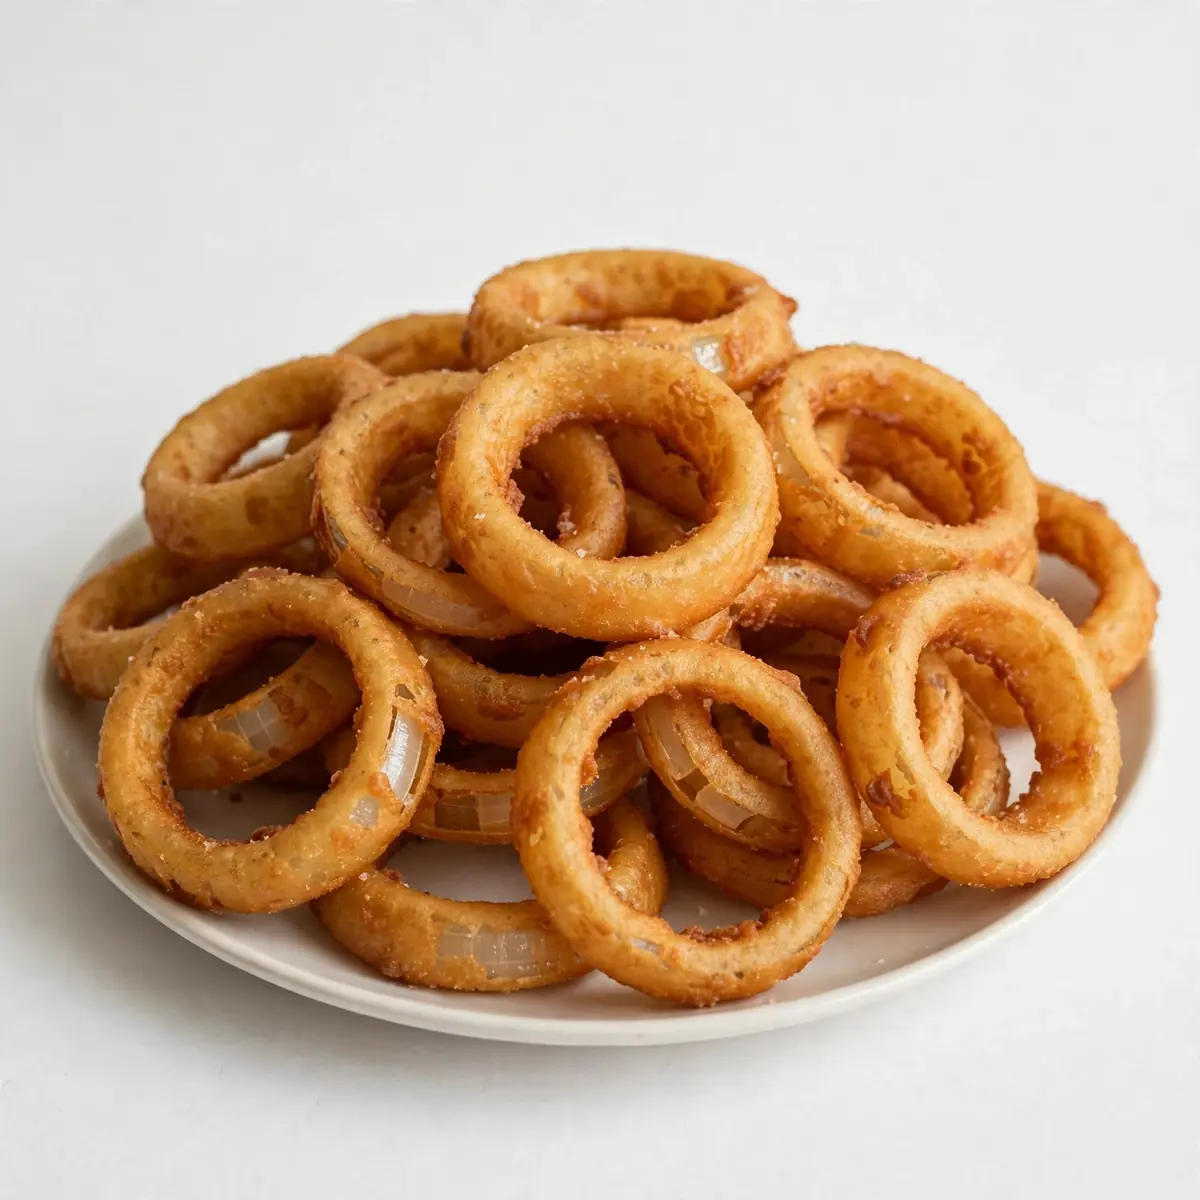
I still remember the first time I served a pile of homemade Classic Onion Rings at a dinner party. I had spent hours perfecting a steak, only for the golden, craggy rings to steal the entire show, disappearing from the platter before the main course had even been plated. That’s the moment I realised these weren’t just a side dish; they were the star appetiser, a true test of a home cook’s attention to detail. My goal today is to give you every secret I’ve learned over the years to create restaurant-quality onion rings that look as incredible as they taste, turning a simple gathering into an unforgettable meal.
Recipe Overview
- Prep Time: 25 minutes
- Cook Time: 15 minutes
- Total Time: 40 minutes
- Servings: 4 as an appetiser
- Difficulty: Medium
Why You’ll Love This Classic Onion Rings
- Impressive Plating: Each ring comes out perfectly uniform, golden, and crisp, making a stunning centrepiece for any table.
- Restaurant-Quality Crunch: The batter is engineered to stay shatteringly crisp for a surprisingly long time, just like your favourite steakhouse serves.
- Beautifully Seasoned: A carefully balanced blend of spices in the flour means every bite is savoury and satisfying, never bland.
- Simple, Reliable Technique: I’ve been making this for over 6 years, and it never disappoints. This method avoids soggy or burnt rings every single time.
- Versatile Showstopper: Whether served alongside a hearty Pulled Beef Sandwich Recipe or as a solo starter, these rings elevate the entire meal.

Ingredients You’ll Need
- 2 large Spanish onions (or white onions)
- 250 ml buttermilk
- 1 large egg
- 200 g plain flour
- 50 g cornflour (cornstarch)
- 1 teaspoon baking powder
- 1 teaspoon smoked paprika
- ½ teaspoon garlic powder
- ½ teaspoon cayenne pepper (optional, for heat)
- 1 teaspoon fine sea salt
- ½ teaspoon black pepper
- 1 litre vegetable oil (for frying)
Tip: For the best texture, make sure your buttermilk and egg are at room temperature before you begin. This helps the batter cling to the onion slices much more evenly.
How to Make Classic Onion Rings
- Prepare the Onions: Peel the onions and slice them into 1 cm thick rings. Separate the rings gently, discarding the tiny inner ones or saving them for another dish. You’ll want only the large, sturdy rings for the best presentation.
- Create the Marinade: In a shallow bowl, whisk together the buttermilk and egg until the mixture is pale yellow and completely smooth, with no streaks of egg white visible.
- Soak the Rings: Submerge the onion rings in the buttermilk mixture, ensuring each one is fully coated. Cover the bowl and refrigerate for at least 20 minutes. This step tenderises the onion and helps the batter stick, creating that crisp shell.
- Make the Dry Coating: In a separate, wide bowl, combine the plain flour, cornflour, baking powder, smoked paprika, garlic powder, cayenne (if using), salt, and pepper. Whisk thoroughly until the spices are evenly distributed throughout the flour; you should see a uniform, slightly peachy colour from the paprika.
- Heat the Oil: Pour the vegetable oil into a large, heavy-bottomed pot or deep fryer. Heat it to 180°C (350°F). To test, drop a tiny pinch of flour into the oil; it should sizzle and float immediately without smoking.
- Coat the Rings: Working with one ring at a time, lift it from the buttermilk, letting the excess drip off. Drop it into the flour mixture and toss gently with a fork until completely coated. Shake off any excess flour; you want a light, craggy coating, not a thick, pasty one. You should hear a soft rustling sound as you shake off the loose flour.
- Fry in Batches: Carefully place 4-5 coated rings into the hot oil, ensuring you do not overcrowd the pan. Fry for 2-3 minutes, flipping once halfway through. The rings will turn a deep, golden brown and the sizzling will become more vigorous. When done, they will feel rigid and light when lifted with a slotted spoon.
- Drain and Season: Transfer the cooked rings to a wire rack set over a baking tray. Immediately sprinkle with a tiny pinch of flaky sea salt while they are still hot. Do not use paper towels, as they will trap steam and make the rings soggy.
Tips From My Kitchen
- Don’t Skip the Cornflour: Cornflour is the unsung hero of a crisp batter. It lacks the gluten found in plain flour, which means it creates a much lighter, shatteringly crisp crust. I stumbled upon this combination by accident, and it’s been a hit ever since.
- Rest the Batter (If Making in Advance): If you prepare the dry flour mixture ahead of time, let it sit for 10 minutes after mixing. This allows the baking powder to activate slightly, giving the coating a lighter, airier texture when fried.
- Maintain Oil Temperature: Use a kitchen thermometer religiously. If the oil is too cool, the rings will absorb grease and become heavy. If it’s too hot, the outside will burn before the onion inside has softened. That steady 180°C is your golden zone.
- Use a Wire Rack, Not Paper Towels: As mentioned, paper towels create steam. A wire rack allows air to circulate all around the ring, keeping every side perfectly crisp for longer. This is the single biggest trick for professional results at home.
- Season Immediately: Salt adheres best to hot, freshly fried food. If you wait even a minute, the salt will simply bounce off. A light sprinkle of flaky sea salt right out of the oil makes a world of difference to the final taste.
Equipment You’ll Need
- Large, heavy-bottomed pot or deep fryer
- Sharp knife and cutting board
- 2 large mixing bowls
- Wire rack with a baking tray
- Slotted spoon or spider skimmer
- Kitchen thermometer
Common Mistakes to Avoid
- Overcrowding the pan: When you drop too many rings in at once, the oil temperature plummets. This leads to greasy, limp rings instead of crisp ones. Fry in small batches of 4-5, allowing the oil to come back up to temperature between batches.
- Wrong temperature: Guessing the oil heat is a recipe for disaster. Without a thermometer, you risk burning the outside while the inside remains raw. Always use a thermometer to maintain a steady 180°C (350°F).
- Skipping the rest time: Forgetting to let the onions soak in the buttermilk is a common error. This step is crucial for two reasons: it tames the raw, harsh bite of the onion, and it gives the batter something to grip onto, preventing it from sliding off during frying.
Delicious Variations to Try
- Spicy Version: Add an extra teaspoon of cayenne pepper to the flour mixture and a dash of hot sauce to the buttermilk marinade. The heat will bloom in the hot oil, creating a fiery, addictive ring.
- Vegetarian/Vegan Option: Replace the egg with 2 tablespoons of ground flaxseed mixed with 5 tablespoons of water (let it sit for 5 minutes to gel). Use a plant-based milk mixed with a teaspoon of lemon juice instead of buttermilk. The result is just as crisp and delicious.
- Different Protein Pairing: These rings are magnificent alongside the Steak Bites With Garlic Butter Recipe. The buttery, savoury notes of the steak are a perfect counterpoint to the crunchy, sweet onion rings.
What to Serve With Classic Onion Rings
- A creamy chipotle dipping sauce or a classic ranch dressing.
- A crisp green salad with a sharp vinaigrette to cut through the richness.
- Grilled steak or a juicy Cheesy Beef Enchiladas Dinner for a truly memorable meal.
- Cold, non-alcoholic beverages like a sparkling lemonade or iced tea.
Frequently Asked Questions
Classic Onion Rings
Ingredients
Method
- Prepare the Onions: Peel the onions and slice them into 1 cm thick rings. Separate the rings gently, discarding the tiny inner ones or saving them for another dish. You’ll want only the large, sturdy rings for the best presentation.
- Create the Marinade: In a shallow bowl, whisk together the buttermilk and egg until the mixture is pale yellow and completely smooth, with no streaks of egg white visible.
- Soak the Rings: Submerge the onion rings in the buttermilk mixture, ensuring each one is fully coated. Cover the bowl and refrigerate for at least 20 minutes. This step tenderises the onion and helps the batter stick, creating that crisp shell.
- Make the Dry Coating: In a separate, wide bowl, combine the plain flour, cornflour, baking powder, smoked paprika, garlic powder, cayenne (if using), salt, and pepper. Whisk thoroughly until the spices are evenly distributed throughout the flour; you should see a uniform, slightly peachy colour from the paprika.
- Heat the Oil: Pour the vegetable oil into a large, heavy-bottomed pot or deep fryer. Heat it to 180°C (350°F). To test, drop a tiny pinch of flour into the oil; it should sizzle and float immediately without smoking.
- Coat the Rings: Working with one ring at a time, lift it from the buttermilk, letting the excess drip off. Drop it into the flour mixture and toss gently with a fork until completely coated. Shake off any excess flour; you want a light, craggy coating, not a thick, pasty one. You should hear a soft rustling sound as you shake off the loose flour.
- Fry in Batches: Carefully place 4-5 coated rings into the hot oil, ensuring you do not overcrowd the pan. Fry for 2-3 minutes, flipping once halfway through. The rings will turn a deep, golden brown and the sizzling will become more vigorous. When done, they will feel rigid and light when lifted with a slotted spoon.
- Drain and Season: Transfer the cooked rings to a wire rack set over a baking tray. Immediately sprinkle with a tiny pinch of flaky sea salt while they are still hot. Do not use paper towels, as they will trap steam and make the rings soggy.
Notes
I hope you feel ready to take these Classic Onion Rings to your next gathering and watch them disappear. They are more than just a side; they are a statement of care and flavour. I’d love to hear how they turn out for you, so please drop a comment below and share your own plating triumphs or questions!